"For the Guys" is the seventh (7th) course I have taken in the Altenew Educator Certification Program. The course is taught by Jennifer Rzasa and gave me several techniques that I have never done to create a card for guys.
For my first two cards I chose to use this cute little set from Altenew - Mini Delight : Polar Bear stamp and die set. One of our lessons was creating a card that looks like pop art. I have to say I would not have thought of creating a card like that. However, it did make for a fairly quick and fun way to create a card. For one card I chose 4 different colors of cardstock - I was able to use some of my stash of scraps for the squares and the polar bears. I decided to add a little visual interest to the cardstock by ink blending through the Altenew Square Weave stencil. I like the texture it added.For the second card I had the idea of ink blending bright colors on white squares of cardstock. I thought this would be a fun twist to the pop art look and it also incorporated another technique from my class. That technique is using geometric shapes - I think the square weave counts don't you?
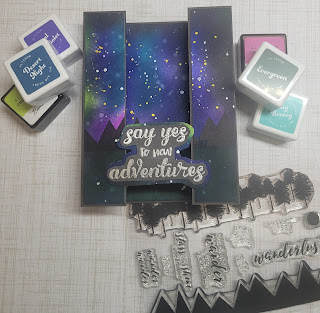
For my last card I chose to make a card that incorporated "galaxy" and "interactive" - 2 other lessons. I decided I wanted to try my hand at ink blending a Northern Lights background.
I used multiple colors for the ink blended "Northern Lights" - all inks used are from Altenew. I used Easy Breezy, Razzleberry, Bamboo and Crystal Violet for the lights. After laying down the base colors for the Northern Lights I ink blended Desert Night and Navy along the edges and randomly over the lights and just a touch of Jet Black along the edges to finish the ink blending.
I then took the mountains image from Altenew's Wanderlust stamp set and stamped it across the panel in Jet Black. One I had the mountains stamped I stamped the trees 3 times across the bottom of the panel. I used Altenew Fresh Dye Ink in Evergreen to stamp the trees and then to ink blend over the trees and the bottom edge of the panel.
After I finished stamping and ink blending I put a small amount of water in my hands and flicked it across the panel then blotted with a paper towel. For the finishing touches I splattered a little white and gold shimmer paint onto my Nothern Lights panel. For the interactive portion of the card I used the Bridge Fold. This creates a card that "pops" open when you take it out of the envelope. Due to the way you fold the card it can be put into an envelope fairly flat.
When creating a Bridge Fold card you need to take a piece of cardstock that has been cut to be 10.75" x 5.5" then you score the cardstock from each end at 1.25", 2.25" and 3.25" - then mountain/valley fold those scores. I cut my Northern Lights panel and cut pieces off the end to fit the front fold - just slightly smaller then the 1.25" front fold. I then cut the piece for the back panel of the card - this one was slightly smaller than 4.25" the width of my card. After adhering all the panels on to a piece of grey cardstock I embossed the sentiment - "say yes to new adventures" in silver. I then fussy cut around the sentiment - mounted it onto left over piece of the Northern Lights panel and fussy cut that as well.
A little bit of adhesive on each end of the sentiment and then attached it to each of the front folds of the card.
This was a fun class and I really LOVE the way the Northern Lights turned out. Not sure I captured it well in the photos but it is really pretty in person. Yes pretty but still masculine enough for a guy!
Leave a comment and let me know what you think.


 t then die cut the circle - hot foiled the bright pink circle onto the die cut then used Copic markers to color the part of the bouquet that is on the circle.


