Wednesday, April 24, 2024

Altenew Inspiration Challenge


Today, I am playing along with Altenew's Inspiration Challenge found HERE.  I used a coloring page fro. Altenew's Exotic Blooms marker coloring book. 


Saturday, April 13, 2024

AECP Level 3 - Stencils

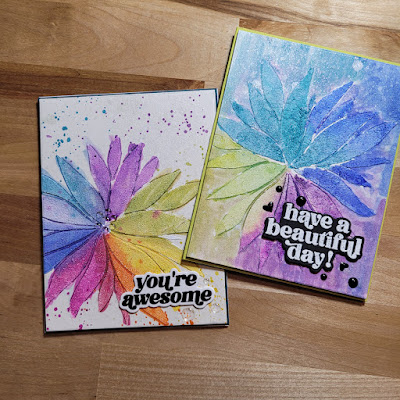
For this homework assignment I used Stencil Art: Charming Delight layering stencil set and Sketched Lines stencil. I created this card after taking #altenewacadamy class Stunningly Styled Stencils and All About Layering  - stencils edition. I incorporated several of the lessons in this card, including flipping the stencil over, using embossing paste through a stencil, stenciling the image, and fussy cutting. 

I colored the embossing paste with Desert Night Watercolor marker pigment. I used Fresh Dye inks that correspond to the colors in the #altenewinspirationchallenge and even added a little Iridescent Shimmer spray to the flower bouquet to account for the snow in the inspiration photo.

I really like how this turned out. What do you think?


Wednesday, April 3, 2024

Let's get Krafty Challenge #163


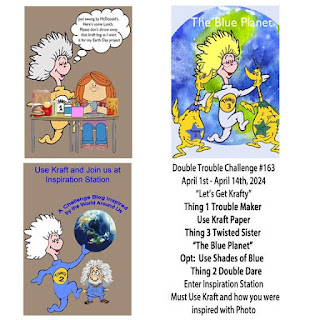
To participate in Double Trouble Challenge #163 - Let the Troubles Begin  I began by using Kraft cardstock as my card base. (Thing 1) I watercolored the debossed side of my card panel. Inspired by Inspiration Station Prompt #60 photo of the world in hands  I chose to color all the area around the florals (continents) blue ( Starlight Alcohol marker) symbolic of the water that fills our earth. (Thing 2- Double Dare) The blue around my image is for Thing 3 - shades of blue. Lastly I added Iridescent Shimmer Spray to simulate the shine of water.


 Let me know your thoughts.

Thursday, March 14, 2024

AECP - Magic of 3D Embossing

What a fun class. I have had a lot of fun with my 3D embossing folders.  I have several cards to share today - a few of the cards I created were because of the teaching of Laurel Beard and a few were just ideas I had floating around in my head.  

For my first card I used Altenew's Mega Bloom stencil and with a few fresh dye inks I stenciled this beautiful flower onto white cardstock.  Then I took Peony Sunshine 3D embossing folder and ran it through so that the peony was EMBOSSED on the stenciled side.  Then I took the same inks I used to stencil the bloom I used to drag across the raised peony image.  I think this card turned out rather interesting and I will definitely be trying this again.  (stay tuned as I already have a card lined up with this technique).

Using a 3D Embossing folder packs a lot of punch for the amount of effort you put forth.


For my second card, I used the Reverse Blackout method. The reverse blackout method is done on the debossed side of the image.  The first thing I did was to apply ink with my blending brushes to the inside of the embossing folder so that the debossed image would be colored.  

Then taking a dark ink pad - typically black - you drag the ink pad across the debossed image.  This adds the black ink to the edges and to the raised areas of the debossed image creating some shading.

A close up of the debossed image


I used black for this method but in the next examples I was eager to try some other colors and see how they appeared.


This third card is using the Blackout Method on the Embossed side.  However, I chose to use blue ink to drag across the flower and greens for the leaves.  Then I used a really dark green across the rest of the cardstock.  After I had the entire image covered I used a dark green and black to ink blend the edges creating a halo effect around the flower.  I then used some shimmer sprays to splatter across the panel.  I also use some clear gemstones around the sentiment but I am not sure I like the gemstones.  I do like this combination of blue and green.


For this card, I again chose to do the Blackout Method but I wanted to see what it would look like if I used a different color that wasn't dark.  I REALLY love the effect on this one.  I really rubbed the embossed image with Navy Fresh Dye ink - this created great shading.  The edge of the card I used a mix of pinks - Rubellite and Razzleberry before ink blending the edges.  The last thing I did was to use Bold Alphabet dies for the HI - I used the woodgrain embossing folder and embossed the letters and then did ink blending with the pinks and hit the high points with navy.  You have to see this in person because it is really striking!

What do you think?  Which is your favorite?


Thursday, March 7, 2024

Peony Sunshine - embossed and stenciled?


I had an idea I wanted to try and here's the result. I first ink blended the flower using Altenew's Mega Bloom stencil. Then I took the Peony Sunshine embossing folder and added some ink to the side that would emboss - reds and pinks to the flower and greens and easy breezy to the leaves. Once I had the ink added I then embossed the stenciled image.  I also dragged the ink cubes thst corresponded to the colors I used in ink blending across the embossed image.  My final step was to spray with Altenew's Iridescent shimmer spray. Love the shone it adds. 

I'm using this card as my entry into the Altenew March Inspiration Challenge.


Monday, February 12, 2024

AECP Level 3 - Modern Watercolor

For the past few nights, I have been watching the videos in Altenew's Modern Watercolor.  I am intrigued by watercolor and thought this would be a perfect Level 3 course for me.  It was a fun and interesting course.   Preeti Chandran has a very soft soothing voice and is a good instructor.  I learned a lot from both instructors, but I really do love Laurel Beard.  She is funny and I love the way she approaches the classes she teaches.

For my first card the method I used was using Altenew's Woodless Watercolor Pencils to color on a stamp, spritz with water and then stamp it onto the watercolor cardstock.   (All products I use are from Altenew unless otherwise stated.) The stamp set I used is Mini Delight Plants and Vases.  This set has 4 images that are different branches or twigs of leaves.  I wet the watercolor pencil in a jar of water and then colored onto the stamp.  After I got the image where I thought I wanted it I spritzed it with water and then stamped it on the cardstock.  The second method I used on this card was to use a template and watercoloring.  I used the vase dies in this set to deboss into the cardstock and then colored in the debossed images.  The last thing I did for this card was to add a light wash of color around the vases and branches before stamping a sentiment in Black Obsidian Pigment ink.


For the second card I used a different method which involved using watercolors to color embossing paste and then using that in a stencil.  I also used the previous method of using the watercolor pencils to color the stamp image.  For this card, I used the single floral image in Vintage Garden   I used greens on the leaves and then from the center of the flower out I used reds, oranges and then yellow.  I spritzed the stamp with water and stamped this onto white cardstock (for this card I did not use watercolor cardstock).  I reapplied color to the stamp in the same order and again spritzed with water before stamping on cardstock.  For this step, it is important to use a stamp positioner of some sort so that you can stamp over the image in the same place each time.  Once this watercolored image dried, I then used the stencil for this image and spread my previously colored embossing paste onto the flower.  I had colored my embossing paste with a red, yellow and green.  I applied these pastes over the similarly colored areas of the flower.  Then I removed the stencil and set this aside to dry.  
For the background, I used the Sketched Lines stencil and applied the paste through the stencil onto white cardstock.  Before I cleaned the stencil I spritzed it with water and then used the stencil to stamp onto white cardstock. As the next step to coloring the background I used Ruby Red, Warm Sunshine and Frayed Leaf shimmer sprays over the background over the similarly colored embossing paste.  Once the floral image was dried I die cut it and added used foam tape to mount it to a black piece of cardstock which I then foam mounted to the background I created.  I added a sentiment from my stash - this is from the One Go Sentiment set.  And all was mounted onto a black card base.

The last card I created was inspired by the Galaxy watercoloring class which involves using Metallic watercolors on dark cardstock.  Instead of creating a galaxy type of background I used the method to watercolor through the stencils of the Stencil Art Watercolor Garden set.  This stencil set creates a large floral image.  I used Altenew's Metallic Watercolor pan set and painted through each stencil to create my floral spray.  I absolutely love how this card turned out.  I used regular black cardstock and just used a light hand with the water.  I layered several colors and let them mix and blend a bit. I let the panel dry between each time before adding the next stencil layer.  Once I had finished with all the stencil layers I add a bit of water to a few of the colors and made a thick mix that was splattered onto the cardstock.  I added sentiments from my stash - One Go Birthday Sentiments and Essential Sentiments.

Please head to Altenew to check out their products.  So many awesome items to chose from - stamps, stencils, inks and more.  

Let me know what you think about my projects!

Friday, February 9, 2024

AECP Level 3 - Demystifying Mixed Media


This week I worked on the second of five courses necessary to finish the Altenew Educator's Certification Program.  Demystifying Mixed Media taught by Tania Ahmed.

This is definitely a method that is messy and fun.  Kind of freeing in a way.  Almost feels like there are no rules.  I created two cards while working through this method.  All products used are from Altenew unless otherwise noted.

The first thing I did was to take a white card panel 5.5" x 4.25" and stamp various sentiments from Sunshine Flowers stamp set and placed them randomly in various directions on the card panel.  I stamped the sentiments in gray and then clear embossed.


After heat embossing the sentiments, I used Warm Sunshine and Ruby Red Fresh Dye Inks and ink blended over the panel (top image).  I then took the teeny tiny little floral images from the Mini Starry Flower stamp set and stamped them in embossing ink and heat embossed in antique gold - again randomly placing the floral images.  Once this was done I took the Beveled Squares Stencil and spritzed over it with Ruby Red and Warm Sunshine Shimmer Sprays.  I sprayed the Ruby Red over the Ruby Red ink blended portion and Warm Sunshine spray over the Warm Sunshine ink blending.  Then I took the stencil still            covered with shimmer sprays and flipped it over on top of a white                                                                                                 panel - left image.

Once I had the panels colored to my liking with the shimmer sprays I took the idea cards including with my Vintage Garden stamp set and die cut two of the floral images.  The larger image had a little splattered orange and yellow on it.  I placed that into my splatter box and spritzed with more of the Ruby Red and Warm Sunshine shimmer sprays.  I finished by dropping a couple of drops of Ruby Red Shimmer Spray into Embossing Paste and smoothing a bit of the paste through the Beveled Square stencil onto the floral image.  Once this had dried I used foam tape to mount it onto the card panel.  This card was finished by adding some sentiments that had been hot foiled using the Essential Sentiments set.

Then I started work on the 2nd card.  I took the leftover embossing paste that I had used on the first card and spread it onto the Warm Sunshine colored portion.  I took two strips of cardstock that I had trimmed off the first card and added them to the card panel.  I used alcohol markers to color the second die cut floral image using the same colors as the fresh dye ink and shimmer sprays as well as some lighter colors in the same family and a light green.  I added foam tape to the back of the flower before placing it on the card panel.  I used more of the gold foil Essential Sentiments that I keep in my sentiment stash.  After adding this panel to a black side folding card base I splattered with Black and Antique Gold sprays.

This was a fun class and a good excuse to just feel a little wild and not worried about perfection.  You should try it too sometime.  Let me know what you think.

I share product links (and some are affiliate links which means I will receive a small portion of the sale at no extra cost to you). I truly appreciate your support of our card adventures! 


Thursday, February 1, 2024

Another entry

 My second entry for Altenew's January Inspiration Challenge .

Again, I started out with an Altenew Coloring card. 


When I first saw one of tbe inspiration cards created by Kelli Griglione I was thinking purple and orange and again I am working on creating a dark background. And as per my "use" I added splatter using Altenew Shimmer spray.


Altenew Inspiration Challenge

  Today, I am playing along with Altenew's Inspiration Challenge found  HERE.   I used a coloring page fro. Altenew's Exotic Blooms ...